Category: product reviews

  • the top 3 reasons i love my apple watch

    apple watch

    For my birthday, David got me an Apple watch.

    Up until a couple of weeks before that, I hadn’t given them a second thought. Actually, if I thought about them at all it might have been along the lines of, “those are silly.” But then I saw someone at work wearing one, and it looked nice. So I did some research, and decided it would be a neat thing to have.

    I’ve only had it for a couple of weeks so I’m sure I’m not even using it to its full potential, but so far, it’s pretty great. I wanted to share the reasons I love it so far, in case you’re interested!

    I’m LESS connected to my phone.

    This was the number one reason I decided to ask for the Apple watch. If you don’t know, it is basically an extension of your phone. You would think that having it on your wrist would make you even more attached, but I find the opposite to be true. You know how when you get a text, you open your phone to read it and then ten minutes later you realize you’re still scrolling Instagram? Well, now when I get a text I can glance at my watch to see what it is without being tempted by all the other apps. I can respond to it on the watch (with a quick text reply or emoji that I can choose, or with an audio that can also dictate to text), or I can dismiss it.

    Also, I like to be able to set my phone down in the house and not have to worry about missing an important call or text. Or when I’m out doing errands, I can just leave it in my purse instead of holding it or keeping it in my back pocket (which is a terrible idea anyway because it almost falls out of there every time I go to the bathroom).

    A lot of apps ARE accessible on the watch, but they have more limited function so I don’t spend time on them there. For example, I like to get Instagram notifications so I can see what my favorite people post right away, and I can like their photos, but commenting is harder and you can only see the last five or so photos in your feed.

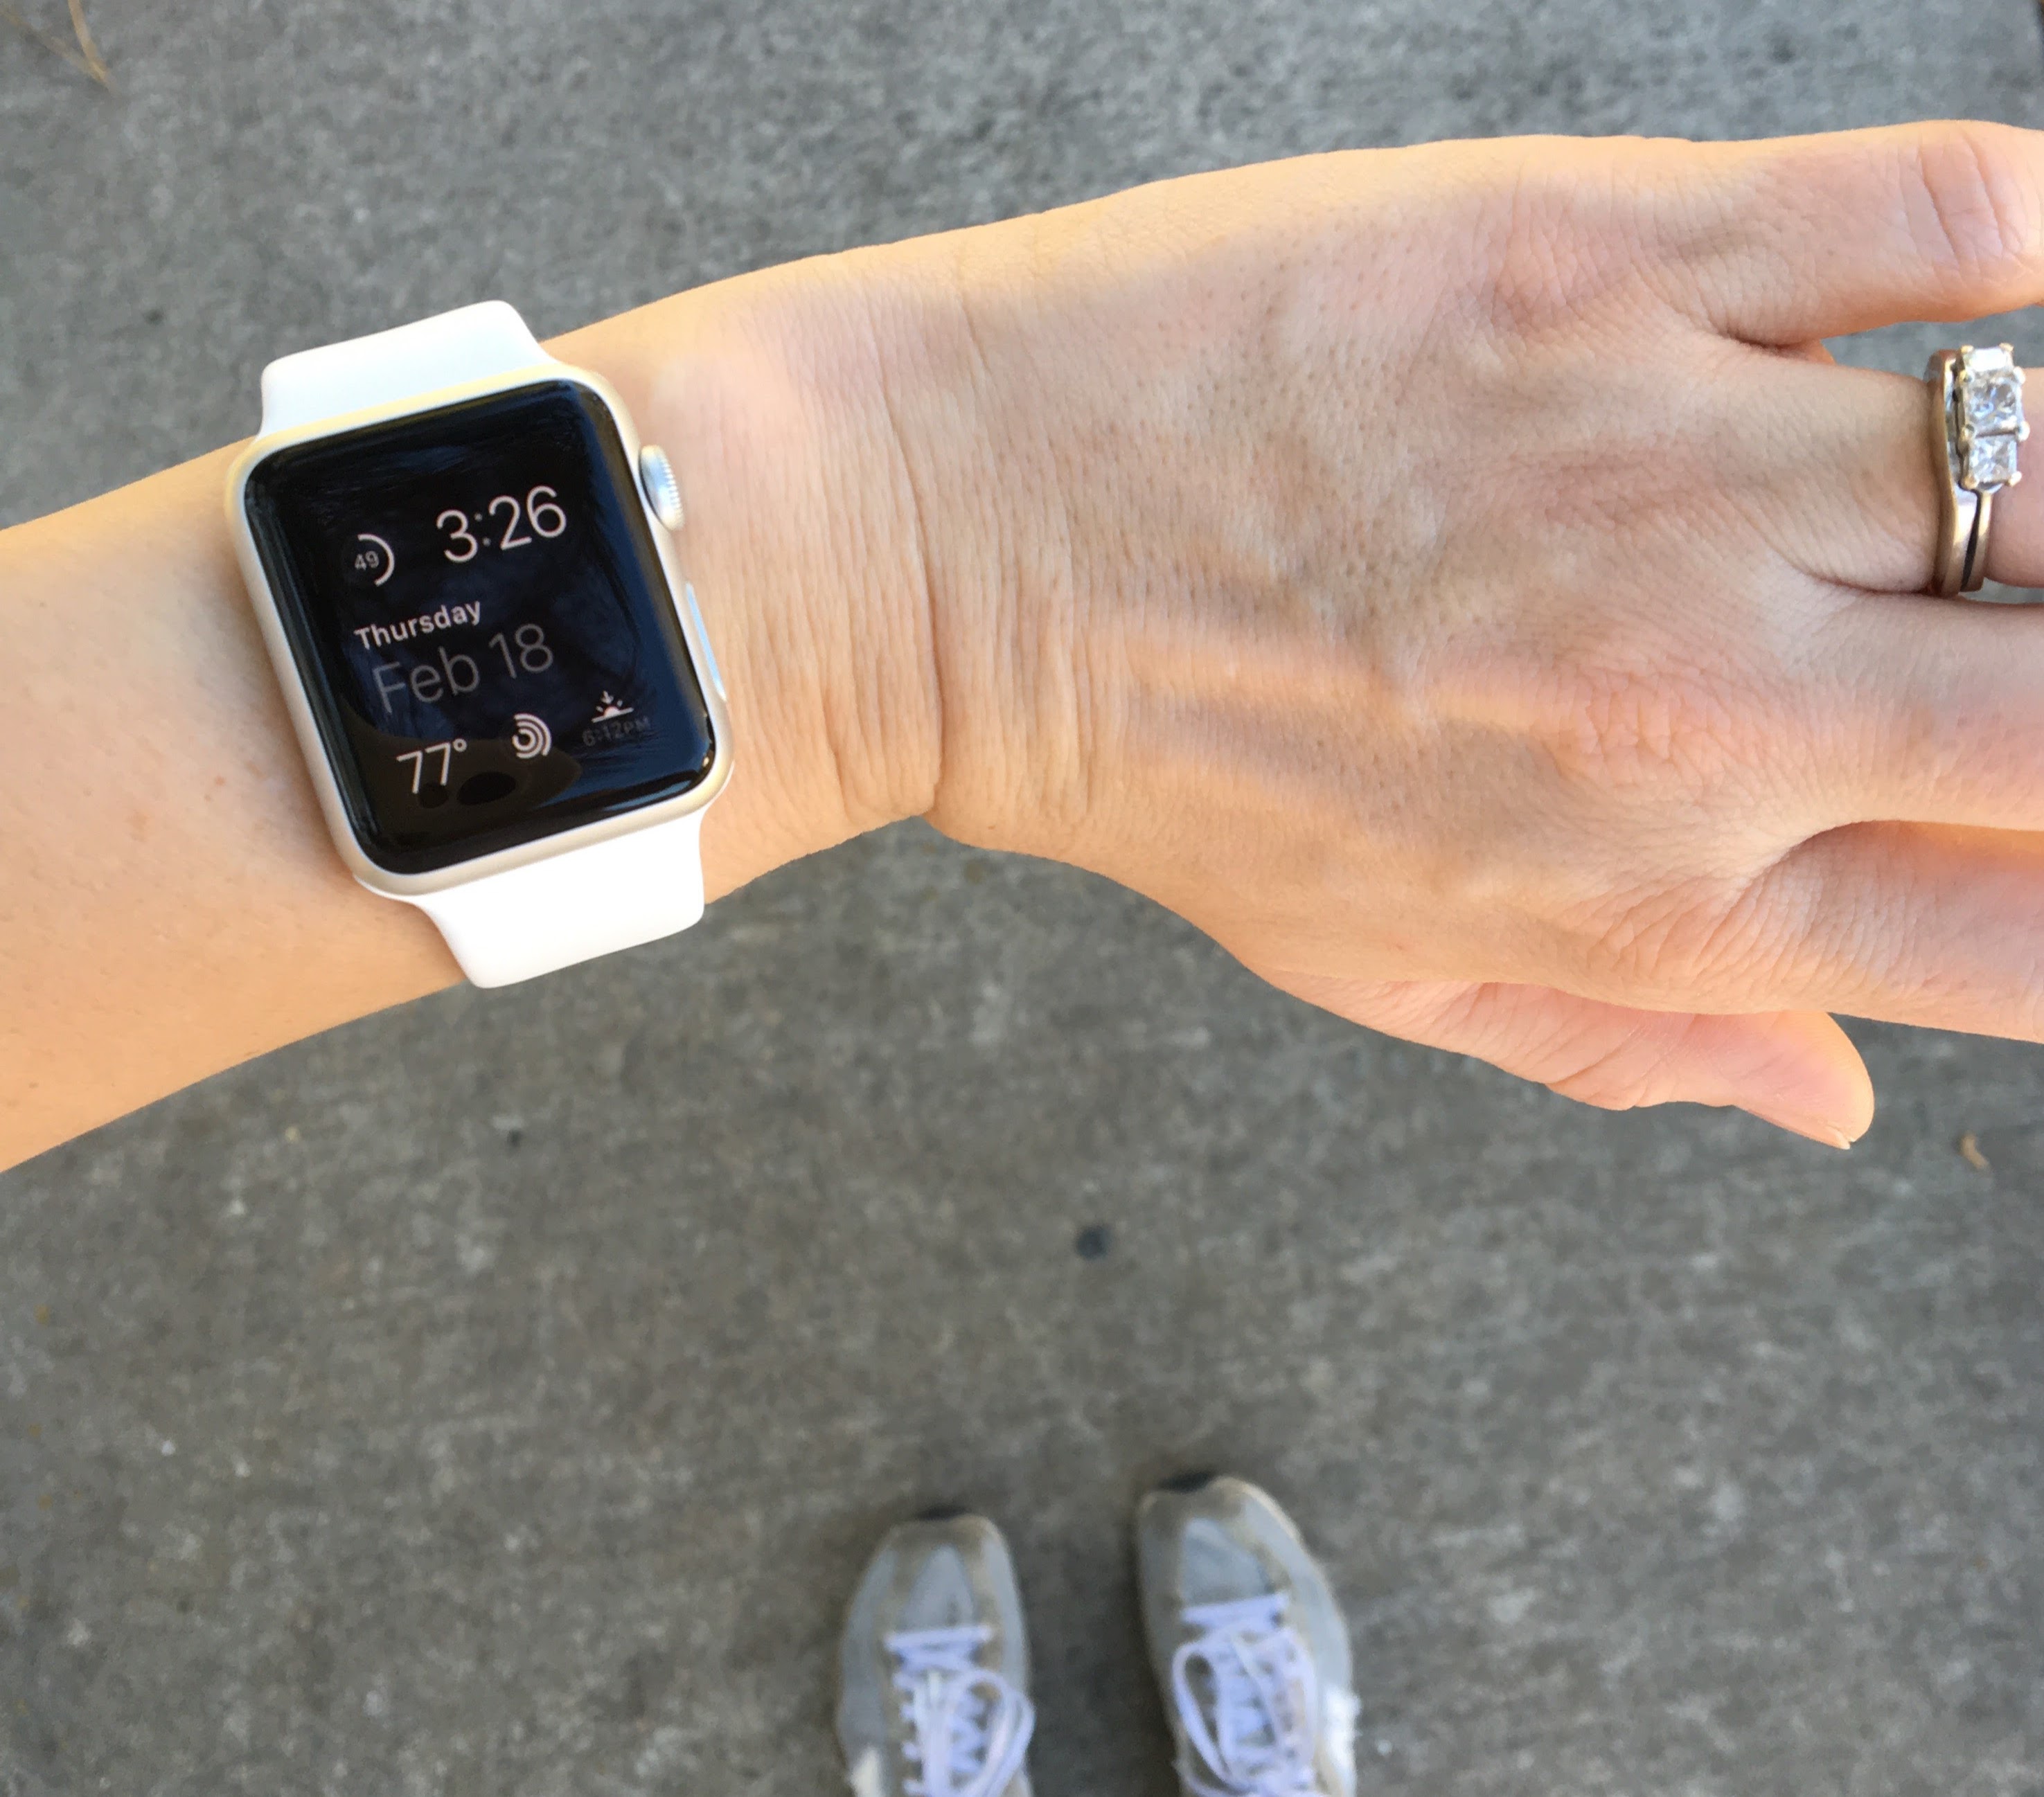
    Helpful information at a glance

    There are a lot of different choices for the watch face, but I like the modular one pictured above which gives me extra info. Besides the time and date, I love just looking at it to see what the weather is like, and a quick tap gives the forecast. I never gave much thought to the exact time of sunrise and sunset before, but I’m finding it surprisingly helpful! Especially when we are planning our evening, I know just how much time we have to go for a walk or to the park before it will get dark.

    You can also choose which apps to have show up when you swipe the home screen. So far other than the standard info, I have my to-do list and calendar connected. Plus, the Commit app gives me a notification on my watch at the time I specify (it’s what I’m using to track my daily tasks like taking vitamins). So handy and helpful.

    Reminders to move

    The Apple watch has a pretty cool activity app. Although I still wear my Fitbit Flex (mostly because I have to for work to get discounted insurance, and I like the social aspect) it doesn’t give me any reminders (although they do have some models that do). The Apple watch activity app gives you three goals: to stand once an hour for 12 hours, to get 30 minutes of exercise (which includes walking), and to hit your calorie burn goal (you choose the difficulty). It gives you gentle reminders when you’ve been sitting for too long, or when you’re close to hitting a goal. It also has a heart rate monitor that is really accurate: I compared it while using an oxygen saturation monitor at work and they were within 1-2 beats.

    So, while the Apple watch is definitely a luxury, it’s one that I’m glad I have. I recommend it as a gift idea, or if you have a mobile plan that lets you pay in installments with no interest. (We have T-Mobile and chose this option; it’s only $14 a month.) It’s so fun and convenient.

    Let me know what you think, or if you have any questions!

  • using frugal real food meal plans

    The other day I found an old journal of mine from 2010. In it, I documented some goals that were more like ideals of how I want to be living. Here is what I wrote for the “food” category:

    using frugal real food meal plans

    Looking back, this was also right after I read the book Animal, Vegetable, Miracle by Barbara Kingsolver. I would say that this is the time my “real food” journey began.

    My real food journey

    Since then I’ve had a lot of ups and downs with the process. Having kids to feed was a big incentive to do better. Completing whole30 was a huge step. Nowadays we have some health issues in our family – nothing huge, and nothing specific like food allergies – but nevertheless, it’s given me the kick in the pants needed to take this to the next level.

    For the past year I’ve been pretty good about meal planning and cooking; it’s been necessary because of how tight our budget is. However, some processed foods have remained in our diets, the Chick-fil-a dinners became a little too frequent, and we had amassed a store of too much candy and unfortunately Meredith knew where to look for it. Also, to be honest I had gotten lazy about trying new meals and I think we were all getting tired of eating the same things over and over.

    So I was inspired to give Frugal Real Food Meal Plans a try. I have been following Tiffany’s blog for some time, and it has just been the most incredible resource. I was pretty sure I would like the meal plans, but just to be sure I downloaded the 14-day sample plan. I wanted to see the meals and the setup – and sure enough, it looked great.

    I wanted to test out the plan for a month before committing to an extended subscription, so I signed up for the month-to-month option ($15). Then if we like it and find that it’s helping us, I think I’ll sign up for the 3-month, and eventually go for the year-long subscription to get the best value.

    using frugal real food meal plans

    Meal Planning

    So here is what I did, in kind of a step-by-step way, to get us going eating (almost) all non-processed food using the meal plans:

    1. First I read through the plan. It’s almost 200 pages long, but most of that is recipes. I read all the notes, all the prep, all the lists, and skimmed the recipes.

    2. I crossed out a few of the recipes that I knew wouldn’t work for us. For example, I do NOT eat seafood. So we won’t be making the clam chowder. :)

    3. I read through all of the recipes carefully. This was time consuming. Some of the recipes have ingredients that also have to be made from scratch. When reading I was trying to decide how long the meal would take to prepare, and whether prep could be done ahead of time. Basically, I needed to know if it was suitable for a weeknight, after-work meal or whether I’d have to make it on the weekend. Next to each recipe on the plan I wrote: short (10-30 min), medium (30-60 min), or long (an hour or more). If it was more than an hour I tried to estimate how long it would take and I wrote that down too.

    4. I printed out a blank calendar for the month and put in any events that we had scheduled that would affect our dinner plans.

    5. I filled out the blank calendar with the meals on it, but personalized for us. I left off the meals we wouldn’t be eating, and rearranged a few due to time constraints and scheduling. I made sure to notice if one meal used leftover ingredients from a previous meal, and in that case I kept those meals in order.

    6. I scheduled the meal prep. If something can be done ahead of time, I want to do it. On the calendar, I wrote in red what prep needs to be done each day.

    7. I decided what I was going to be buying instead of making from scratch. Maybe one day I’ll be able to make everything from scratch, but I don’t want to get too overwhelmed. For now, I’m going to be buying: canned beans, tortillas, corn chips/taco shells, bread, and yogurt. I’m going to try to make from scratch all sauces.

    8. I read through the recipes again, this time focusing on ingredients. At the same time, I made my shopping list. I decided not to use the one that was provided because of all the adjustments I made, and I want to do our shopping on a weekly basis.

    After all this, I felt like I had a really solid plan. I’m not going to lie – it took me several hours. But I had a really good feel for what the process is like, and a plan for the entire month. The second month I used the plan it all went MUCH faster, too.

    using frugal real food meal plans

    Doing it!

    There were just a couple more prep steps for me. First, I cleared our kitchen of almost all the processed & junk food we had built up. I threw some of it away and donated the rest. Then, I sent David shopping for my grocery list!

    For me, the actual “executing” of the meal plan started on a Sunday. I don’t even want to tell you what all I had to YouTube that day, but it included things such as “how to seed a cucumber” and “how to slice brisket.” Guys, there is a LOT about cooking that I don’t know! That day I spent probably 2-3 hours in the kitchen, but I got a meal made and lots of things prepped for the week.

    I’ve been using the plan for two months now and it’s been a big success. We still eat processed food sometimes, but at least I know that most of our meals are going to be nutritious. Everything has gotten easier and it fits in to my working mom lifestyle. Eventually I’d love to branch out into making more things from scratch, but for now – baby steps!

    I highly recommend trying out Frugal Real Food Meal Plans, OR another option is to purchase the Ultimate Homemaking Bundle for $29.97:

    You get an entire library of homemaking ebooks and ecourses, and these meal plans are included! SUCH a great deal. It’s only available until next Monday though! I’m a huge fan of these bundles and can’t wait to dig into this one. Let me know if you have any questions!

  • the project life app : a detailed review

    project life app review

    Y’all know how much I love Project Life if you’ve been reading for any length of time. Well, if you haven’t heard – there is now a Project Life app! It’s $2.99 for iPhone and iPad. At first I wasn’t sure that I would really use it. After all, I like to have a physical album. But in the end I couldn’t resist purchasing it, and today I want to give you the lowdown on what it’s actually like and ideas for using it.

    Let’s go screen by screen to see what it does!

    project life app review: screen 1

    When you first open the app, you have the choice to watch an intro video or not. Later, the video doesn’t open but you can find it in the info section. The above left screen shot is the standard opening screen, and from there you have four options, which are very clear.

    Above right, you’ll see what it looks like when you open the library. It saves your in progress pages and collages, completed pages, and completed collages (we’ll get to those in a minute). Something is saved as in progress when you X out of the screen and there is at least one blank spot there. It is saved as completed if all the spots are filled, regardless if you still wanted to make changes or not. Tapping “more options” allows you to sort things by different dates.

    Also in the library you can view all the kits available to you with their contents, and view/purchase new kits. With a future update, you will also be able to order prints from here.

    On to the heart of the app, making a page.

    project life app review make a page

    Making a page

    So when you open up the “make a page” template, you have the option to customize a few things. You can choose the kit you’re working with (or color palette, shown above right). The app comes free with Kraft, Midnight, Strawberry, and School-Themed kits. So if you don’t like any of those, be aware that you’ll have to purchase what you want (cards and kits are either $0.99 or $1.99 depending on how much is included). Thankfully I use Midnight almost exclusively these days!

    You can also customize the background of your page layout to a different color, whether you want rounded or square corners, and the layout of the page itself. It comes free with most standard layouts, and then there are three extra layout packs you can buy for $0.99 each. (Popular page layouts that aren’t included free are: Design F, Design H, and Design E.)

    project life app review adding journal cards_edited-1

    Journal and filler cards

    So then you tap on the space that you want to edit. You can choose to fill it with a photo or a journal card. When you tap the journal card icon, it takes you to your kits and you can pick any card you want, from any edition. You can use a combination of kits on the same page as well. Here, I chose a title card from the Midnight edition, and on the right you can see it zoomed out.

    project life app review journaling and fonts

    On any journal card that has space to write, you can tap on it and open the keyboard to write. In the above right screenshot, you can see the options you have for editing the text. You can change the font color, the font itself (there are eight options there), the size, line spacing, how much space is above the journaling (vertical offset), and the justification.

    A couple things I want to mention: you can only add text on specific areas of the journal cards that allow it. It’s not free text anywhere, and you can’t move it around super creatively. Also, some of the journal cards that have white space are categorized as “filler cards” and so you can’t write on them. And some of the journal cards have title spaces that aren’t editable, and without adding text there, it looks kind of funny. Examples:

    project life app review filler cards

    Above left is a “filler” card that doesn’t allow text editing, but obviously it needs it. Above right you are unable to add text to the white box at the top. I’m hopeful that they’ll fix these issues in future updates.

    project life app review adding photos

    Adding photos

    If you choose to add a photo, it opens up your albums on your phone. You can do some basic editing of the photo right there as well: brightness, contrast, saturation, and rotating. You can’t add text to your photos, so if you want that you’ll have to do it beforehand using another program or app.

    Another cool option is to add an item from Dropbox. To do this you have to have a Dropbox account and have the app installed on your phone. If you want to use your own custom cards, this is how you’d do that. I used it to insert the week in review cards I use on each spread.

    Once you have your photos and cards in place, you can move them around by dragging and dropping. They just switch places. It’s very easy.

    Uses for the Project Life app

    1. Comprehensive memory-keeping. One obvious use for the app is to make a page on it, export it as either an 8×8 or 12×12, and then either save your pages up to make into a bound photobook, or print them and slide them into page protectors. You could easily do all your scrapbooking with this app and have gorgeous books to show for it.

    2. Planning your physical pages. So far, this is how I’m using it and it’s saving me a ton of time. I can start planning my pages ahead of time in the few minutes here and there I have to spare (even with my kids around) and then when it’s time to make the physical page it takes half the time.

    project life app planning

    On the left: my planned page. On the right: my actual page. 

    3. Inserts. If you do physical Project Life albums and want to stick with that (I do, for now) you still might want to consider printing out pages from the app for inserts. It just might be easier to get more photos in or to get the layout you want, especially if you don’t have a variety of page protectors.

    4. Special events or traveling. If you have a big event you want to document in addition to your regular spreads, you might think about using this to make a mini photobook instead. It would also be perfect for traveling because you can work on it as you go.

    So what do I think?

    I think it’s a really neat app that does a whole lot for a low price. I love having it to plan and I look forward to using it for inserts and other occasions. One of my friends is considering switching over to using it exclusively.

    It’s not a substitute for Photoshop if you like stuff truly customized, but with the Dropbox feature and using other apps to edit photos you can get your spreads pretty close to exactly what you want.

    So have you seen or tried the Project Life app? Could you see yourself using something like this for memory keeping?


  • recent things i love

    things i love

    The Wet Brush – I don’t like to condition my hair more than once a week, but that means that any time I shower in between conditionings my hair is kind of a beast to brush through when it’s wet. I used to skip showers just so that I wouldn’t have to deal with it. (Now I just skip them because…eh. Don’t need a good reason.) This brush really does make it a lot easier. It doesn’t get the tangles out on the first pass through or anything, but it doesn’t make me want to hack off my hair or arm, either.

    Aden + Anais muslin blankets – Everyone says these are the best so I finally shelled out for them even though we had tons of other blankets. Now they’re the only ones I’ll use. They make swaddling super easy and I love how large and thin they are, so they’re a lot more versatile than other blankets.

    Apple TV – David got this for his birthday a couple weeks before Liam was born and I am so grateful. We have the worst cable imaginable and considering I’ve spent most of my days resting on the couch it’s been so nice to have good TV to watch. I haven’t really watched TV at all since my last maternity leave, and without it the days can feel very long and lonely. With Apple TV I can watch most new shows, Netflix, and HBO Go. We also use it to play YouTube clips and songs for Meredith to dance to. :)

    Q-snap frame – For any of you stitchers out there, this is an alternative to an embroidery hoop that I discovered a few months ago. It comes in a bunch of sizes but is a square or rectangle shape. I find it a lot easier to hold and manipulate than a hoop.

    The Honest Company diapers & wipes – We were given a generous gift by my brother and SIL to try this out, so I went ahead and signed up for the diapers and wipes bundle. So far it’s awesome and I’m afraid I’m going to be addicted. The diapers are super cute and Liam has not had a blowout yet. They are natural and eco-friendly and the bundles are really customizable. This is working great for us right now, but I am not sure yet what we are going to continue to do for the whole diaper situation. But that’s a topic for another day, and I’m sure you can’t wait. :)

    ***

    Not a sponsored post, but some affiliate links are used. 

  • erin condren planner review

    As this year winds down to a close (whaaat) you might be thinking about how you’re going to do your planning for next year, at least if you’re an organizational and list nerd like me. This year I purchased an Erin Condren weekly planner because I won a gift card in a giveaway. Even though I do most of my planning digitally (and am very much entrenched in my system) I was curious about the hype and wanted to see if I could adapt it to my lifestyle.

    cover

    These planners are very popular so you might know what they’re like already, but in case you don’t: they are large, colorful, personalized, detailed, and include extras like stickers and labels. There is an overview of each month and then it is laid out weekly. I decided to use the included stickers on just the monthly overview pages so I could glance at them and know if there was a birthday or event coming up.

    month

    The bulk of the planner is laid out weekly. There are no time slots; instead it is separated into morning, day, and night. I really like that part. Since there were three big spaces per day to fill, I started using the “morning” space for my work assignment, the “day” space for blog post planning, and the “night” space for meal planning.

    week

    For awhile I liked using a physical planner again and would dutifully get it out every day. I know that if I didn’t have a complex digital system already this would be a great option. But after awhile I began using it less and less. It’s pretty large and heavy, and eventually I realized that it wasn’t worth carrying around anymore. For my work assignment now I use sticky notes, for blog planning I use the WordPress editorial calendar plugin, and for meal planning I am using Google calendar synced with my phone. It’s all working great for me, and for the rest of my planning I use Google calendar synced with my phone plus the Things app. Check out this post for more info on how I tackle time & task management.

    If you love physical planners, have a lot going on, and have a big bag or purse I definitely recommend checking out the Erin Condren planner, but I found it wasn’t the thing for me. Tomorrow I will share with you the notebook that I do carry around with me!